

Making home cured and smoked bacon might sound complicated, but it’s actually pretty straightforward and the rewards certainly outstrip the effort!
Traditionally cured and smoked bacon has a taste and texture beyond any you can buy in a supermarket. The process is centuries old and originally designed to preserve in the days before refrigeration. Today it is a means of adding delicious layers of flavour.
THE PROCESS You will need salt – with or without curing agents. Ready-mixed curing salts contain permitted low levels of Sodium Nitrite and Potassium Nitrate which will eliminate any bacteria for safe home curing. We’ve tried both plain salt and ready-mixed cures and we’ve lived to tell the tale. The plain salt results were a little grey in colour (commercial cures also pump up the pinkness of the meat) but they still performed the basic task of reducing the moisture content which is the breeding ground for bacteria. Through this moisture reduction there’s a natural intensification of flavour as the meat darkens in colour and shrinks in size.
Once cured and stabilised, cold smoking creates a final seal as well as adding more wonderful flavour.
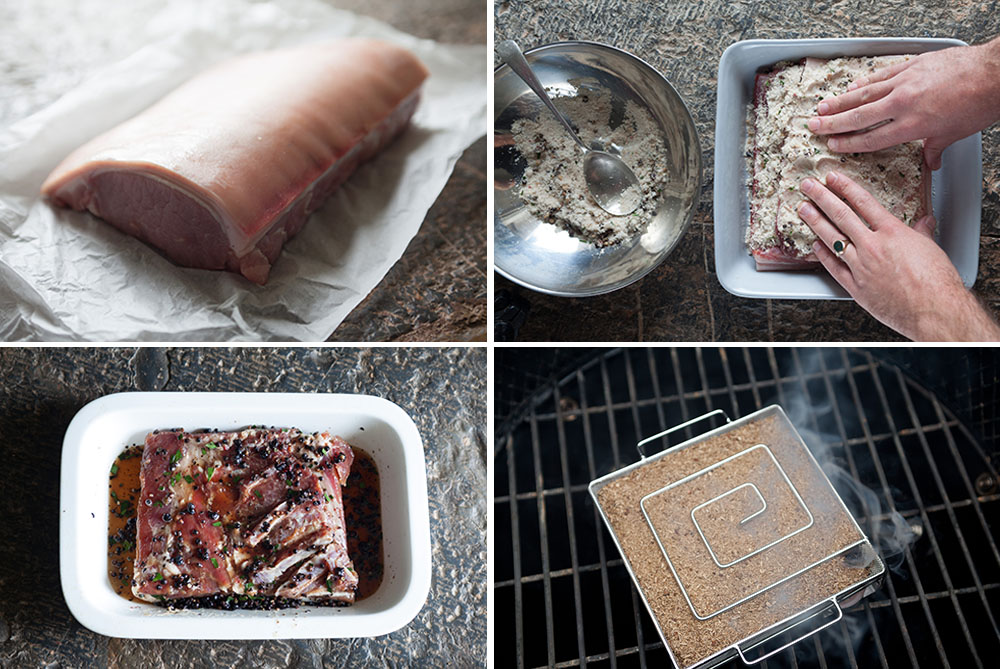
SELECTING YOUR MEAT You will need a fresh pork loin for back bacon or belly pork for streaky bacon which you can buy in a supermarket, though would recommend buying from your local farmshop or butcher. Having reared our own pigs, there’s a world of difference between commercially grown and small batch outdoor reared pork. The meat is darker, richer and there’s usually a thick layer of fat, which all adds to the flavour!
TIMING You will be able to complete both curing and smoking over a 5 to 6 day period but with only a 20 minute time commitment per day.
STEP BY STEP GUIDE
DAY 1 Mix the cure
Use around 60g of cure mix to every 1kg of meat. Add sugar at a rate of 10% of the final cure quantity. You can use white sugar, but we prefer the caramel flavours of raw cane sugars. Chop the central stem out of the fresh bay leaves and chop the rest of the leaves finely. Lightly crush mixed peppercorns including zingy pink peppercorns and juniper berries and add these along with the bay to the salt and sugar mix. Add extra spicy notes if you’d like a little extra heat.
Place the pork into a ceramic dish or food grade container and scatter around a third of the cure mix onto the based of the dish and then onto every surface of the pork, including the sides and the fat layer. Rub in gently. You may need some food grade gloves for this. If the joint is particularly thick pierce with a wooden skewer to help the mix penetrate. If you are curing two joints of pork, coat each one and stack them on top of each other. Place the dish in the bottom of your fridge and use a wedge of some sort so that it sits at an angle. As the cure takes effect and moisture is extracted it will drain away from the meat.
DAY 2 Add More Cure
Pour away the moisture which will be pooling at one end of the dish. You’ll notice the meat has begun to darken in colour and shrink a little. Also remove any sludgy cure residues. Re-apply more cure mix as per Day 1 and put back in the fridge. Keep back enough cure for at least one more application.
Days 3 & 4 Repeat Day 2
home made bacon curing
Day 5 Wash & Dry
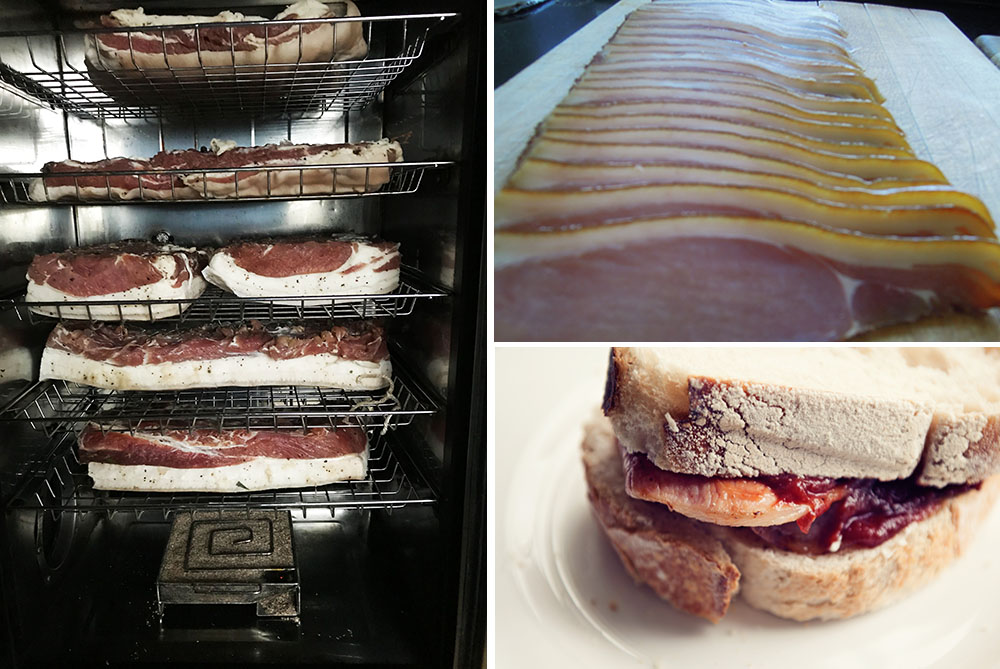
Remove the pork from the dish and thoroughly rinse off the cure mix. Fill a bowl with cool water and immerse the pork for 20 minutes. This does seem counter-intuitive after 4 days of extracting moisture, but this process will ensure your finished bacon won’t be too salty. Using kitchen towel or clean tea towels thoroughly dry the pork then place on a cooling rack in the bottom of the fridge. Allow to dry for at least 12 hours or more if you have time.
Day 6 Smoking
Your pork should now have developed a slightly sticky surface or ‘pellicule’ as a result of the drying process. It’s now ready to smoke. Bring the meat to room temperature whilst you prepare you smoking chamber. A regular BBQ with a lid and ventilation, or smoker is all you need, though you can get creative with repurposing any type of cabinet to give you hanging or shelf space and ventilation.
Many great minds have grappled with the challenge of creating cold smoke flavour from burning wood products, but the mesh, maze style cold smoke generators have solved the problem, so we recommend one of these as your source of cold smoke.
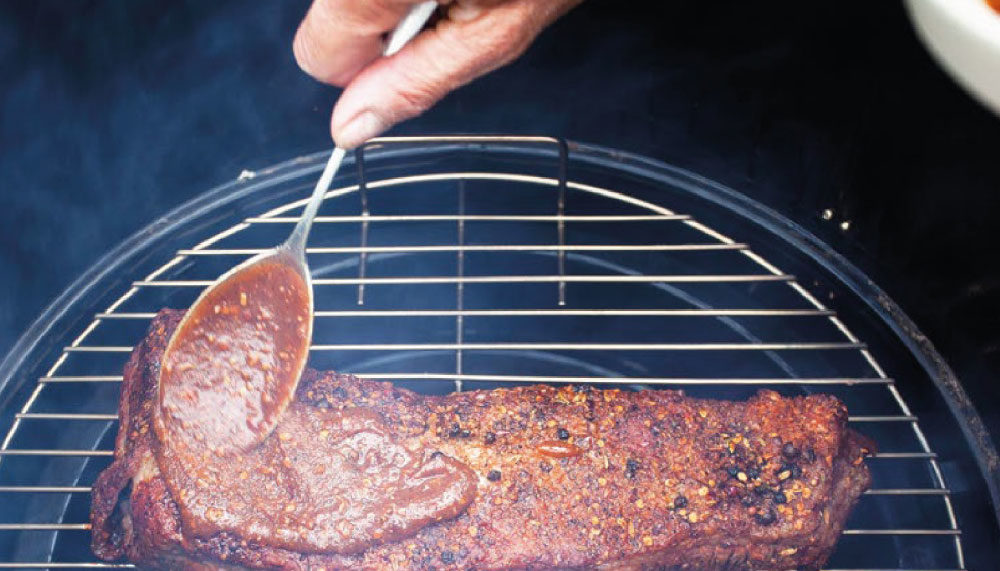
Choose a robust flavoured smoking wood such as Oak or Hickory. Whisky Oak and Maple are also good smoky additions to bacon. Fill your generator, light from the outer corner and once the smouldering is established, extinguish the tealight and place in your smoker along with your bacon joints. Smoke for 10 hours. Experiment with this timing. We think 10 hours of a strongish smoke flavour is just the right complement to bacon, but you can smoke for longer for a deeper smoky flavour.
Once the smoking is complete, allow the bacon joints to ‘settle’, either in situ in your smoker, or in the bottom of your fridge on an open rack.
DAY 7 and Beyond. Cook and Eat!
Your bacon is ready to eat or store. Slice to the required thickness. One of the great benefits of home produced bacon is that hand cutting gives you rustic thick slices but if you prefer more regular, thin slicing, then consider purchasing a meat slicer. You can store your sliced rashers in the fridge for up to 2 weeks. We have sliced and vac packed ours and then put them in the freezer.
home made bacon smoking
INGREDIENTS
Pork loin and/or belly pork joints
Ready-mixed cure
Demerara sugar
Mixed peppercorns
Juniper berries
Fresh bay leaves
Ceramic dish or food grade container
Food grade gloves
Smoking chamber (A BBQ with a lid, smoker or even a cardboard box)
Cold smoker generator (see our ProQ generators)
Oak, Whisky Oak or Maple wood dust
SHARE YOUR CREATIONS
We love sharing ideas and would love to see what you have been getting up to with your food smoking. Don't forget to follow us and tag us in your posts.